This year’s handmade valentines

I’m happy to report we finished Corban’s valentines a whole day early, and I didn’t have to go to the store to buy any supplies for them. Success!

(Tulips to brighten up a freezing rain kind of day and celebrate that our cats are locked in our bedroom for a few days working on some training issues…which I will have to share another time. Oh, and cats in bedroom = flowers are safe from getting eaten by them.)

Last year we were the lame ones who didn’t give out candy with our valentines (which, as a parent, I am great with, but I know the kids get excited about little treats). This year, Corban’s school doesn’t allow any food with valentines (score) but we had a bunch of glow sticks on hand, so there’s our treat. And since puns are not only encouraged but celebrated on Valentine’s Day, here’s what we ended up with:

I traced hearts onto card stock while Corban and Mara cut them out.

Haddon got to be in charge of handing out washi tape while the big kids carefully taped the glow sticks on.

I fixed about a third of the taped glow sticks so they were in the right spots and wrote out the pun while the kids played, and then Corban addressed each with his classmates’ names and signed his name. Oh, and decided which color glow stick each person would like—very important.

Now they are safely tucked in a box so the glow sticks don’t crack before they’re delivered.

Here’s another fun and easy valentine we made one year…

…and a less easy valentine (for that special someone, not your kid’s class).

We also just turned fruit snacks into butterflies with heart antennae one year.

Handmade pop-up valentines

Handmade cards make me giddy, so when Corban had his first real school valentine exchange last year, we sat down together to make the cards ourselves. Corban requested pop-up cards. My goal was to just use what we had to make them. This was not a huge challenge, as I have a hoarder’s supply of paper and I’m a recovering clearance craft supply purchaser.

Here’s what we ended up with and how we did it.

First we cut the cards from cardstock and I had Corban cut two slits in the fold to make the pop up part.

Next I traced a bunch of hearts onto glitter paper and Corban cut them out and added smiley faces with permanent marker.

Corban wrote his classmates’ names on the front of the cards. We had just enough foam glitter sticker letters to use one for the first letter of every kid’s name.

He stamped a heart above the name.

Then he signed his name on the inside.

And finally we glued the hearts onto the pop-up tabs.

Sure, it’s more work than buying a pack of valentines and signing your name, but we had fun in the process and Corban was pretty excited about his cards.

This year Corban says he wants to make his cards again, so we’ll see what we come up with! And I do remember that choosing a box of valentines from the store was always super exciting as a kid, but I’ll save that joy for when I have multiple kids in school.

In other news…

I realize that it’s been a WHILE since I’ve written here, and I’m not sure what made me start typing up a post again last week. Maybe it’s that the only professional writing I’ve been doing for the past year plus has been medical/health related and I’m missing the more creative, fun topics I covered at the Journal Sentinel. If I can keep up posting here, I’ve got a lot to share. Much has happened in the past year!

Berenstain Bears Halloween costumes

We did another full-fledged family costume this year for Halloween. Last year it was Jake and the Neverland Pirates. This year: Berenstain Bears (yes, that’s how it’s always been spelled).

halloween2016-09

Corban discovered the Bear family thanks to the extensive collection of books my parents have from when I was a kid, and these past few months we have been compelled to read multiple Berenstain Bears books a day. You can’t get away with shortcuts with Corban either—he notices if you skip so much as a sentence.

This is a good thing, though: good moral lessons, childhood reminiscence, enjoyable storylines. Naturally, Corban draws connections between the Bear family and our own family of four. He is Brother Bear, Mara is Sister Bear.

So despite a new Star Wars obsession that has them plotting next year’s costumes already, they were excited to dress up as the Bear family for Halloween.

You can’t just go out and buy a Berenstain Bears costume (I looked and came up empty), so we had to get a little bit creative.

Thankfully, I came across this Etsy shop, which sells handmade embroidered Berenstain Bears masks. They only come in kids sizes, so they looked slightly off on Peter and me, but they were perfect for the kids. Without these masks the costumes would have been really obscure, especially since the Berenstain Bears are not normal-looking bears.

Brother Bear was the easiest: blue sweatpants and a red long-sleeve polo (found at Old Navy).

halloween2016-08

Papa Bear was simple, too: Overalls and a yellow plaid shirt.

My original plan for Mama Bear was to buy a blue nightgown and paint white polka dots onto it, but upon realizing how expensive even the most basic long-sleeve nightgowns and dresses are (at least the ones that I could find), my mom offered to sew me a dress. She has years of sewing experience and has made many Halloween costumes throughout my life, and I’m grateful for her expertise and eagerness to help! She used blue polka-dot fleece fabric and modified a basic dress pattern, adding a white collar.

Sister Bear was my project. For her shirt, I just used fabric paint to paint pink polka dots onto an old long-sleeve shirt of Corban’s. I could have bought a pair of regular pink overalls, but Sister’s overalls are slightly different—they have scalloped straps and a straight line across the front and back (no bib). So after hunting around unsuccessfully, I got inspired by something I saw on how to turn an old pair of jeans into shorts overalls.

halloween2016-07

I bought two pairs of pink fleece sweatpants (thank you, Walmart) and went to town. First, I cut two rectangles out of one leg of one of the pairs of pants in order to bring the waistline up to nearly chest-height. I sewed those two pieces together then sewed them to the waist of the other pair of pants.

halloween2016-03

Unfolded:

halloween2016-04

No hemming needed with fleece; yay!

For the straps, I put the newly modified pants on Mara, measured the length the straps should be and cut a scalloped pattern out of poster board.

halloween2016-01

I took the other extra pant leg and cut along the seams to create two long rectangles of fabric. I folded each long rectangle in half lengthwise and cut the scalloped line out of the open side. Then I pinned the edges to prepare to sew them:

halloween2016-02

I carefully sewed along the scalloped edge.

halloween2016-06

Then I turned them inside out and ironed them flat (in the photo below, the top strap shows it before being turned inside out and the bottom one after).

halloween2016-05

I sewed the front of the straps to the front of the pants, and my mom sewed snaps onto the inside of the back straps and back of the pants. The snaps ended up being unnecessary, though; Mara just pulled the straps up over her arms. I did end up pinning the shoulders of her shirt to the straps so they wouldn’t fall down (thanks to the double layers of fleece, you couldn’t see the pins).

halloween2016-10

Oh, and the kids were super excited to wear these gorilla feet slippers we spotted at Walmart. They look enough like bear feet, I guess. They weren’t the easiest to walk in while trick-or-treating, though.

I also concocted some furry gloves for all of us by sewing some felt pieces to cheap cotton gloves to make it look like fur was coming out of our sleeves. If I were to do that again I would have hot-glued the felt…my quick hand-sewing job didn’t really hold up. Mara also refused to wear them, so there’s that.

It was a fun Halloween weekend: costumed play date party Friday morning, adult party Friday night (my solo Mama Bear costume isn’t quite as cute without the rest of the fam…), pumpkin carving and trick-or-treating Sunday and a Halloween party for the kids at our gym this morning.

14883513_10104365931006220_4755394197375787757_o

Hard to believe we are entering November already!

Past years’ Halloween costumes: Pirate/Tinkerbell (2015) | Peter Rabbit/bumble bee (2014) | mouse/cat (2013) | lobster (2012)

Jake and the Neverland Pirates Halloween costumes

Corban’s favorite TV show is “Jake and the Neverland Pirates”—it’s a spinoff of Disney’s “Peter Pan” about a crew of nice pirates (Jake, Izzy and Cubby) who interact with Captain Hook, Smee and their gang. He’s been in full Jake/pirate mode since last year, so naturally he wanted to be Jake for Halloween.

halloween2015-4b

Of course this is the prime age for adorable coordinating sibling costumes, so I convinced Mara to be Tinker Bell (she makes a guest appearance on the show once in a while—it’s set in Neverland, after all).

halloween2015-3b

Corban wanted to get the whole family involved, including stuffed animals, so Peter dressed up as Smee and I was Izzy. The stuffed animals were on their own for costumes, though. (Corban sighed last night, “But Quacky doesn’t have a Scully costume…”)

After browsing the costume selection available online, I decided it would be fun and easy to make all of our costumes.

Fun, it certainly was. Easy? Well, that would be a stretch. It was definitely doable, but all the little details added up and this ended up being the most ambitious costume undertaking I’ve attempted.

But I really did have a blast putting all four costumes together, and I’m pleased with how they turned out.

If you’re looking to make a DIY Jake, Izzy, Smee or Tinker Bell costume, read on for details on each of them.

First, some highlights from our Halloween:

halloween201506

Halloween crafts at the library, and the first test run of the costume. 

halloween2015-6

Somehow we wrangled 15 kids into a Halloween party photo.

halloween2015-5

There’s my Izzy costume.

halloween201502

halloween201500

This poor pumpkin didn’t stand a chance.

halloween201507

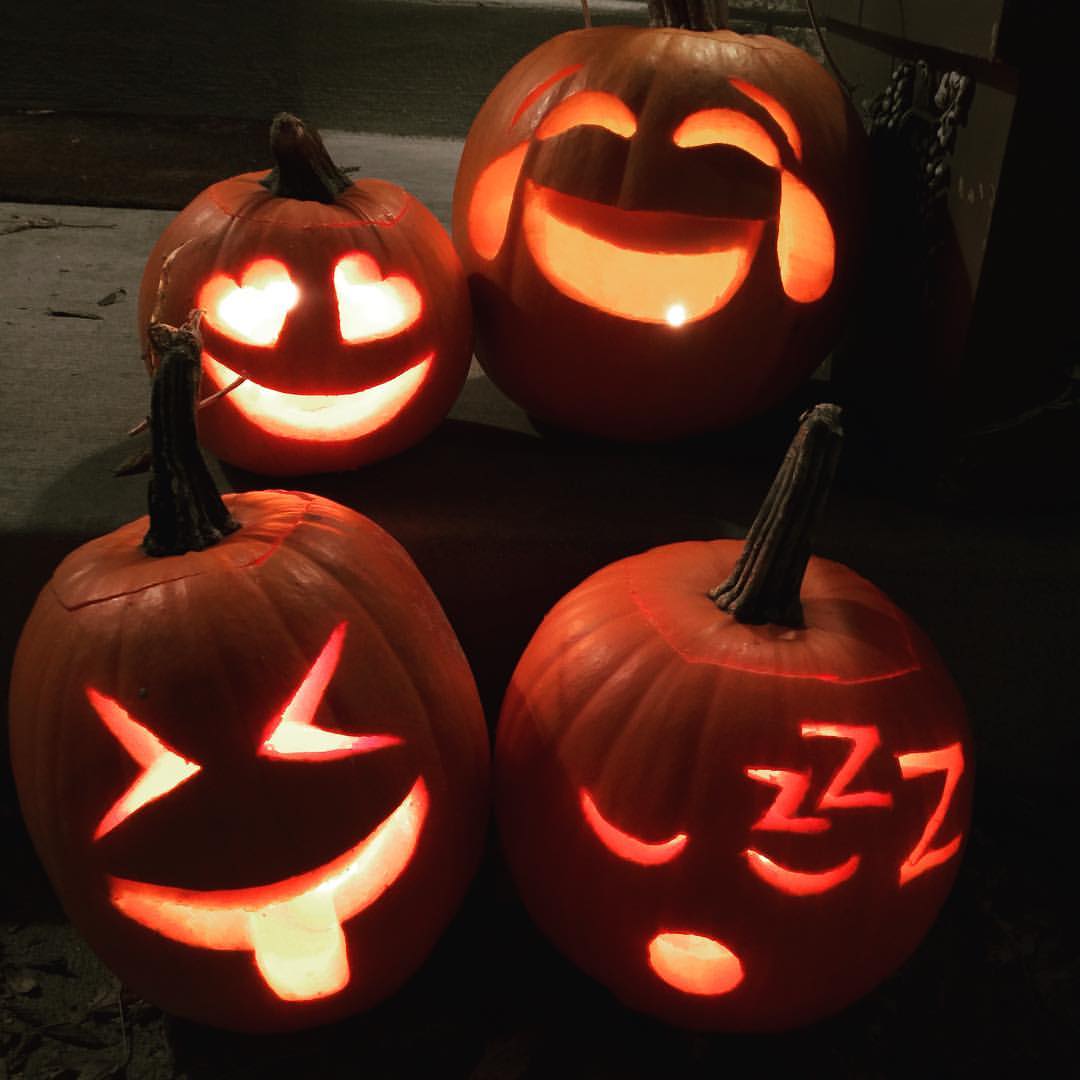
Carved a pirate pumpkin.

halloween201508

And got a little fancy.

halloween201501

Eager to start trick-or-treating.

halloween201503

Tink didn’t end up doing much walking. Plus, it was cold and misting.

halloween201504

Pretty good haul. I showed them how to sort their candy.

Now, for the costume tutorials…


jakefamilycostumes

Jake the pirate

There are three basic parts to a Jake costume: The shirt, the vest and the boots. Let’s start with the easiest one.

Jake’s T-shirt

White T-shirt
About 10 inches black ribbon

Cut the collar and sleeve hems off the T-shirt. Cut a few slits in each sleeve and make a 3- or 4-inch cut down from the middle of the collar.

jake00

Cut two slits on each side of that cut and slide a black ribbon through to form a loose X. Tie the ribbon at the bottom inside the shirt.

Jake’s vest

Navy blue T-shirt
Yellow bias tape (found in the sewing department of a fabric/craft store—it is more like ribbon)
Fusible bonding web (such as Stitch Witchery)
4 yellow buttons
Yellow thread and needle

Cut off the shirt’s sleeves and collar and cut straight down the middle of the shirt to make a vest.

jake1

The 3T shirt ended up being a little too small, so for the final version I used a 5T (Corban is 3, going on 4).

Iron the bias tape to remove any creases. Iron the vest to make a collar.

jake2

Starting from the bottom of one flap of the vest, use the bonding web to attach the bias tape along the edge of the shirt. Since bias tape consists of several layers folded lengthwise, I actually attached mine around the edge—using bonding web on both the inside and outside of the vest. This looks nicer than just attaching it to the outside of the vest.

jake01

Work your way along the edge of the shirt, lining the flap of the collar*, around the back of the neck**, back down the other collar and around the back of the vest, cutting the bias tape into sections as needed (I used six separate sections of tape).

*I attached part of the collar flap to the shirt with bonding web to help keep it in place:

jake02

**”Pop” the collar up as you go around:

jake03

Sew two buttons on each side of the vest. (Side note, why are buttons so expensive?! It took me a good hunt to find inexpensive yellow buttons that were the right size and color.)
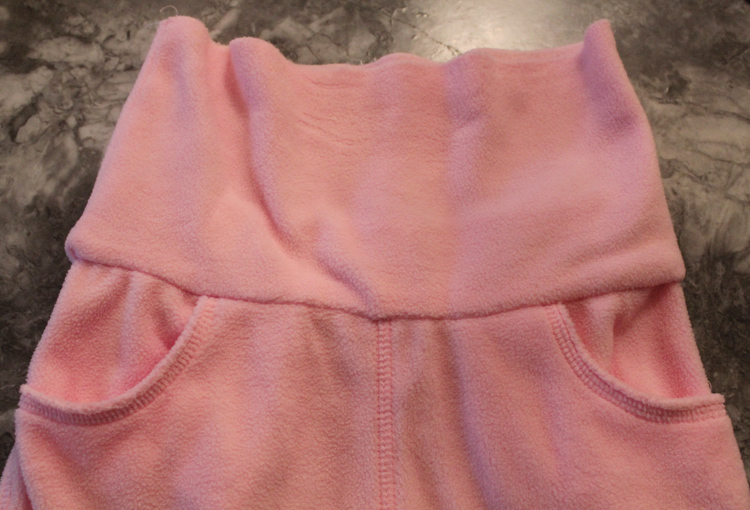
Jake’s boot covers

This was a serious challenge for me, so I’m pretty proud that they turned out. They fit over shoes and are a lot cheaper than Uggs (plus, you can paint Jake’s signature “J” on them). Here’s what you need:
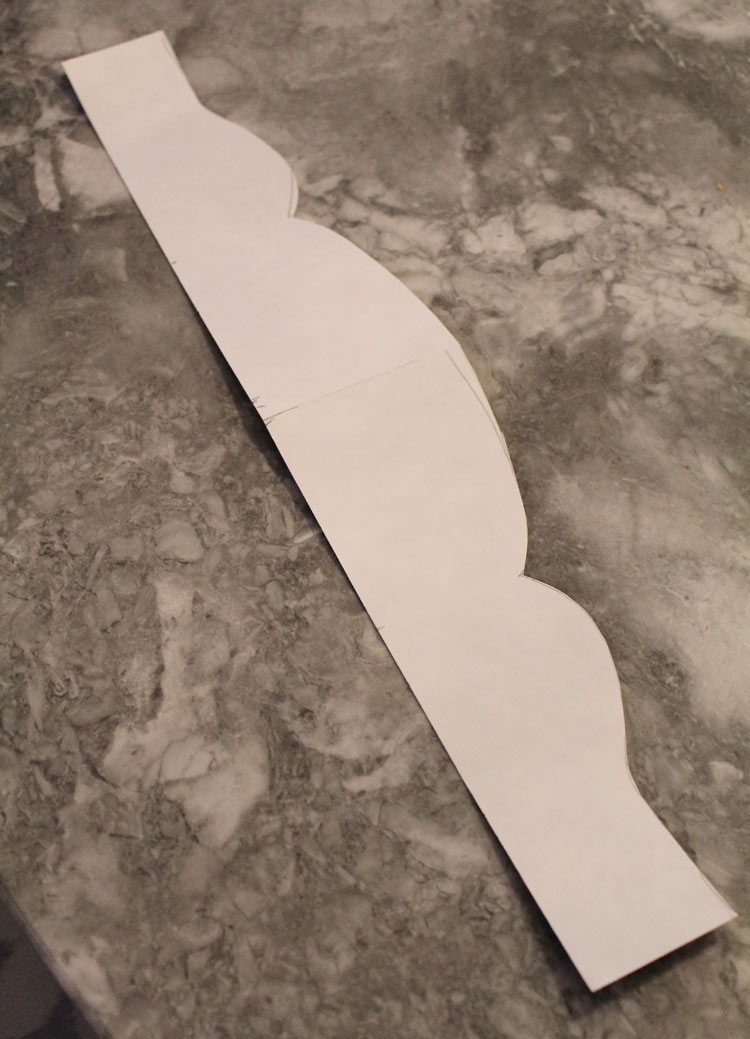
4 yards brown felt
This pattern
Yellow paint (I just used some acrylic I had)

jake04

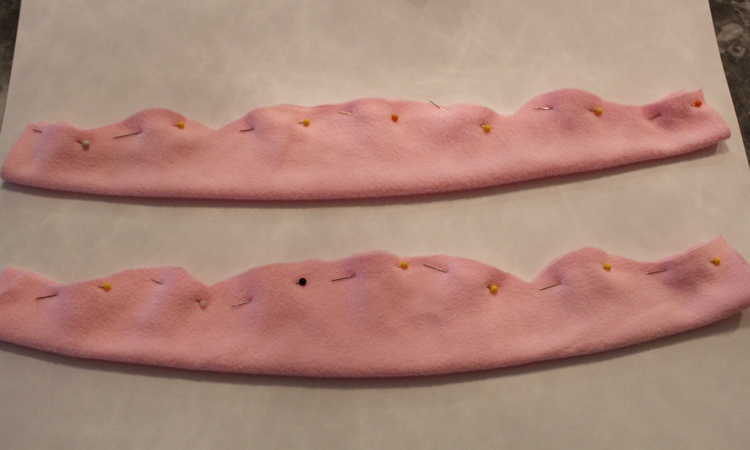
I followed this tutorial. The biggest challenge was to decipher the instructions since they were a bit confusing at parts. One thing I didn’t realize until my mom stepped in to help is that “right sides” in sewing lingo means the sides you want to show in the end, not the sides opposite the left. With felt, it doesn’t matter, but knowing that will help clarify the linked instructions. Another helpful hint: at the start of step 5, turn the boots rightside out.

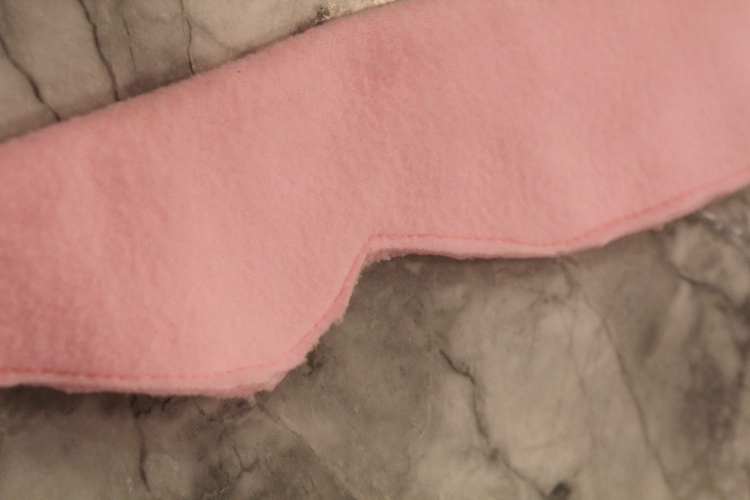
One thing we (my mom) added was to fold and hand stitch the tops of the cuffs into the boot. (Yikes, it’s not easy writing sewing instructions!)

jake05

After the boots are constructed, use a paintbrush to paint a solid gold rectangle on the tops of the feet and Js on the insides of the cuffs. Strangely, the J on Jake’s left boot is a mirror image of the right, so it’s backwards. (I’ve Googled “Jake pirate” images an embarrassing number of times while working on this costume.)

halloween2015-1b

Other Jake elements

Red headband—just a thick strip of red fabric (we already had one from a pirate costume I’ve worn)

Hair—Find some mega extreme hold hair gel (that’s how the one I used marketed itself) and spike that hair straight up in front.

Thick black belt/cummerbund—you could cut up an old T-shirt or do what I did and tie a pair of black tights around your son’s waist (tuck in the ends in the back)

Wooden sword—Peter insisted we buy this instead of attempt to make it. I’m glad we did even though we payed way more than we should have on Amazon for an apparently discontinued Disney Store set of Jake accessories. It’s foam and nice and Corban loves it, plus it came with a spyglass (much better than the paper towel roll I had planned) and pouch of gold dubloons.

Tinker Bell

There are a lot of routes you can take with Tinker Bell. I wanted to be as authentic to the Disney version as possible while making it appropriate for a two-year-old (um, look at Tink…she is a mature, scantily clad woman).

My plan was to do something like this, but use a leotard instead of sewing the body myself. I found an adorable mint green leotard, but at the last minute decided the mint green didn’t look right, so ended up hand-sewing an alternative last night. It was a smart move. Here are the elements of our toddler Tink costume.

Tinker Bell’s skirt

1 1/4 yards green fabric (get something that won’t fray)
Matching green thread
Non-roll elastic (for the waist)
Ruffled ribbon/trim (for the waist)
1 roll cream or white tulle
Thin elastic (for the waist of the tutu)

I followed this tutorial for the skirt. It was simple, even for a sewing novice like me. The ruffled ribbon is a good addition to cover up the seam along the waist.

tink01

Tulle tutus are the easiest thing to make. Just loop-tie strips of tulle to a thin elastic waistband. It’s a fun touch for under the Tinker Bell skirt.

tink02

Tinker Bell’s top

White long sleeve shirt
Leftover green fabric from the skirt
Matching green thread

Cut and pin green fabric to the shirt, starting under the arm on one side and continuing all the way around the shirt. Hand stitch the fabric to the shirt, then stitch it down the side. You’ll tuck the shirt in, so don’t worry about the bottom.

tink00

Tinker Bell’s wings

This took me a bunch of finagling and trial and error. I will try to explain what I did, though.

2 white wire hangers
Pliers
1 pair white adult women’s tights
Small piece of tape
Thin elastic
Glitter glue (optional—I never ended up adding it)

Tink’s wings each have a tall pointed section on top and a smaller, round part on bottom. For a toddler, one hanger is plenty large enough for each wing. First, untwist the necks of the hangers and use pliers to form each into the shape of the wings. Leave a few inches of the end sticking out from the middle and use that part to hook the two wings together by twisting them around each other.

tink1

Now, unhook the wings from one another (stay with me for a minute). Cut the legs off the tights and stretch them tightly over the wings starting over the top section of wing. I twisted them a little in between the two wing sections to help keep the shape, then pulled the open end of the tights back up to the middle after going over the bottom section.

Poke the end of the wire (the part that will hook the wings together) through the tights once the tights are in place. Now, re-connect the wings. The ends of the tights will just be hanging out for now. Wrap tape around the connecting pieces of wire to keep them together (it’s OK if it’s not totally secure at this point).

Tie the thin elastic into a loop that will fit across your little one’s back and hook around her arms. Poke the elastic into the hole of the tights on one wing and finagle it to loop around a section of wire inside, then repeat on the other wing so the wings now have elastic straps coming out from the middle.

Tie the loose ends of the tights together around the connecting wire, pulling one leg around the back, then tying it together with the other leg on the side of the wings that will be facing out (the side without the elastic straps), then bringing both sides around to the side with the elastic and tying them together there (so the legs are tied together on both the front and the back of the wings).

tink03

tink04

Paint glitter onto the wings if desired.

Tinker Bell’s magic wand

1 chop stick or other thin, wooden stick
Silver washi tape
White or cream tulle

Wrap washi tape around the stick in a spiral motion to cover.

Make two tulle pom poms. To make each, cut 20-30 4-inch strips of tulle (1/2-inch-wide). Lay a wider (2- to 3-inch-wide) 4-inch strip of tulle down and stack the 20-30 strips perpendicular on top of it. Tie the thicker strip around the center of the stack of strips and knot it tightly, then knot the ends around the end of the tape-covered stick. Repeat to make the second pom pom and tie it to the same end of the stick but on the opposite side. Tape the ends of the tulle strips you used to tie the pom poms together down to the stick, using the same spiral taping motion to cover them completely.

Separate the 1/2-inch strips in all directions to form a puffy ball, trimming where necessary to form a sphere around the tip of the stick.

halloween2015-2

Other Tink elements

Shoes—Make tulle pom poms as described above, but tie or pin them to the toes of a pair of white or green ballet flats (technically Tink wears green shoes).

Hair—She wears her hair in a high bun with a little ribbon around it and bangs sweeping down and to the side.

Izzy the pirate

Izzy’s shirt

Light pink T-shirt
Darker pink permanent marker

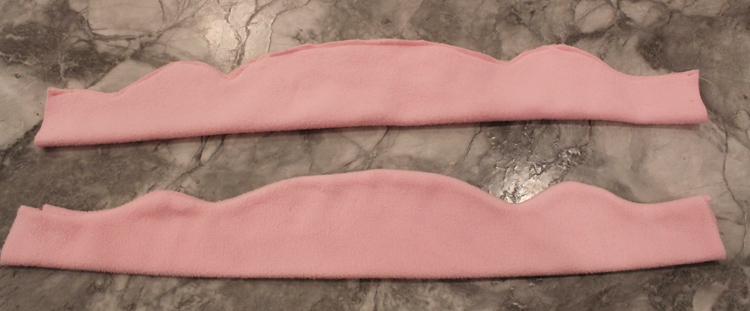
Cut the hems off the sleeves and bottom of a light pink T-shirt. Cut wide scallops around the bottom and sleeves. Outline the edges in marker, adding loops between each scallop. Outline the neckline, adding an upside down V shape at the neck (I messed this part up so it looks pretty bad).

izzyshirt

Izzy’s bandana

Medium pink bandana or old T-shirt
Light pink fabric paint

If using an old T-shirt, cut the hem off the bottom, then cut straight up the middle as high as you can get before hitting graphics, or up to about the sternum or mid-back. Cut all the way around the shirt from that point, so you end up with a large rectangle. Cut it into an obtuse triangle.

izzy00

Paint loops and dots along the edge of the triangle, as pictured.

izzy01

Izzy’s pouch necklace

8-inch circle of yellow fabric
24-inch strip of felt (1/4- to 1/2-inch wide) or two 12-inch strips (or use brown yarn, string or cord)

We had a pouch lying around so I just used that, but you can easily make one by cutting a circle from yellow fabric and gathering the edges together to form a pouch. Tie the felt strips or string around the top to secure it. On the show, this pouch contains pixie dust.

Other Izzy elements

Hair—Pigtails, or if your hair is really long like mine then add braids in to keep it under control. Wrap strips of brown felt around each pigtail. Corban called me out because Izzy has a piece of hair sticking out from the front, so if your hair is the right length to do that, you should probably do it.

Boots—I just wore my Minnetonkas, but you could make boot covers like the Jake ones I made, just without the painted parts (note the pattern I used is for toddler size 8 to 10).

Pants—Izzy wears purple pants. I found these purple fleece-lined leggings on Amazon for $5. They are super warm and comfy, though not the greatest quality (but hey, only five dollars!).

Earrings—Like any good pirate, Izzy wears gold hoop earrings.

halloween2015-famb

Smee

This is oh so easy, hence the reason I switched from the original plan of Peter being Captain Hook.

Hat—Bright red stocking cap.

Shirt—Blue and white striped T-shirt.

Shorts—Royal blue (it was cold so Peter wore jeans).

Glasses—He wears round glasses on the tip of his nose. (Forgot this.)

Belly—Stuff a pillow in if you don’t naturally have a pot belly. Peter was going to, but ended up not bothering.

Sciency fun: Pool noodle marble track

We checked off another at-home item on our big list of summer fun the other week, and it is too good not to share.

Inspired by this blog post and the fun my kids had at an exhibit at the children’s museum featuring golf balls on wooden tracks, we made this genius creation: a marble track.

marbles00

It cost $3 total for two pool noodles and a giant bag of marbles at the dollar store. I used a serrated bread knife to slice the noodles in half, taped them end-to-end with patterned duct tape and then let the fun begin. It took less than five minutes to make our giant track.

marbles01

Corban has been having a blast with it for the past week. He’s gotten more confident in creating his own configurations, experimenting with different heights, curves and items at the end for the marble (or “narble,” as he calls it) to roll into. I love how he’s unknowingly learning about velocity and friction–but to him it’s just fun. Yay physics!

marbles02

Mara likes to help but sometimes gets in the way of big brother’s fun, so I’d say this is more appropriate for ages 3+ (I find it just as much fun as Corban, so it’d be great for older kids too). The shorter race track version like my inspiration would be easier for younger ones.

marbles03

Our cats are fascinated by it, too, so this is definitely something the whole family can enjoy!

In the garden

Last weekend we were at my parents’ after our niece’s birthday party, and Corban helped his Papa with a little gardening.

gardenfun00

I’m torn about how much gardening to do this year. It’s a lot of work, so I’m tempted to take a year off… but I know the kids would love to “help” and it’d provide some great teachable moments.

My dad is already a month in with spinach, lettuce, beans and all sorts of other seeds.

gardenfun04

Some new ornamentation was added to their backyard since our last visit. The concrete stepping stones we made for my grandparents in 1999 have found a new home now that their house is being cleaned out.

gardenfun01

Corban still has a little growing to do to catch up with my 13-year-old hand.

gardenfun02

And I found that apparently my hands have grown just a tiny bit since then.

gardenfun03

The afternoon felt like a taste of summer—warm air, lush grass and a long evening of grilling and relaxing.

gardenfun05

gardenfun06

gardenfun07

Plus some good old-fashioned ball-throwing.

gardenfun08

gardenfun09

I’m finally starting to move my camera off automatic setting. With some shutter speed adjustment, I captured this little sequence:

gardenfun10

gardenfun11

gardenfun12

To bring this back to gardening, we did do a little planting adventure yesterday, using the planting kits in the goodie bags from Isla’s party. We dubbed it “Curious Corban Plants a Seed.”

Since we can’t grow plants inside due to mischievous kitties (see my solution for fresh flowers here) I have been wanting to make mini terrariums using some glass jars from our bathroom. These little pots were the perfect size for that.

It was pretty magical watching the freeze dried dirt pellets grow into a pile of soil.

plantsaseed00

plantsaseed01

I potted the soil and little fingers were eager to push in the seeds.

plantsaseed02

plantsaseed03

It’s a “shrinking plant” that reacts to your touch, so this could be fun once it grows.

plantsaseed04

They will probably outgrow the jars quickly, but by then hopefully we can plant them outside.

plantsaseed05

Even after all this fun and a good chunk of hours spent doing yardwork this weekend, I’m still torn on the to-garden-or-not issue. What would you do? Take a year off and focus on landscaping and a few potted herbs, plus trips to the farmers market? Or plant some tomatoes and zucchini and pray for regular rainfall (less manual watering = less work)?

DIY Christmas card box from a produce box

In year’s past, I’ve hung the Christmas cards we’ve received with ribbon on our kitchen cabinets. I loved being able to see the smiling faces of our friends and family and the beautiful holiday designs of the greetings they sent, but this year that just seemed like too much work and too cluttered.

Instead, I was inspired last night by the cardboard box housing the clementines I had just purchased. It’s a nice box, so why throw it away?

I pulled out some gold card stock, scissors and a glue stick and in less than 20 minutes had transformed it into something worthy of sitting on our coffee table.

cardbox11

First, I traced each side of the box onto the gold card stock.

cardbox2

Then I cut them out.

cardbox3

And glued them securely to the sides.

cardbox4

The blue insides kind of ruin the effect, so I glued some card stock over the blue parts, too. Had I a tad more ambition and time I would have covered the entire inside.

cardbox5

There you have it!

cardbox6

Our friends and family are really killing it with cute photo cards this year.

cardbox8

cardbox9

I also love how the shape of the box sort of looks like Bethlehem’s skyline (at least how it’s portrayed as we often see it).

cardbox10

It’s also nice having them out at kid-level so Corban can browse through them at his leisure. He loves seeing his loved ones’ faces.

Of course, that also means they’re at Mara’s level and thus will probably end up strewn around our family room most of the time…

How do you store or display your Christmas cards?

Decking the halls

Blame the early deadlines at work (we were taste testing holiday cookies in October) or the mini polar vortex, but I’m totally in Christmas mode.

My minimal fall decor didn’t last long this year, but I do want to share this little fall leaf project with you.

falldecor1

Corban helped me pick out some leaves from the yard during peak color season, and I ironed them between pieces of wax paper, using this method, to preserve them. Then I just taped them to white paper and framed them – so easy!

falldecor2

My other fall DIY project was this “Boo” door hanging. It took about 10 minutes to make – tie wooden letters together using twine, make a nice big burlap bow, hang the letters from the door and paper clip (really) the bow on.

Corban started requesting Christmas music the day after Halloween, so we’ve had our children’s Christmas CD on repeat for weeks, but Peter convinced me to hold off until this weekend to fully embrace the season ahead. We went straight from the “Boo” front door to what I’m calling my transitional Christmas wreath (since it has some fall colors in there).

christmasdecor12

Yep, it’s my all-seasons wreath again (here’s the Valentine’s Day version and the fall version.)

Peter’s parents gave Corban a Little People nativity set that we only bring out during the holiday season, so Mara was sufficiently distracted by the “new toy” while I got all the decorations out.

christmasdecor2

I think it’s the cutest.

christmasdecor3

Then up with the tree…

christmasdecor1

For some reason I struggled to make the mantel look cohesive this year. After much rearranging (and removing, adding back and removing again several pieces), here’s what I settled on.

christmasdecor6

The stockings are from Hung By The Chimney on Etsy. They have so many great fabrics! It’s not easy to choose. (Looks like they have a $1 off sale going on right now. I ordered mine in the off season so they were discounted, but not sure if that’s how it always works.)

christmasdecor7

Then, trimming the tree. Corban helped me with this after Mara went to bed.

christmasdecor4

christmasdecor5

A new ornament this year (gift from Peter’s parents last year):

christmasdecor8

I also love this little bird a friend made for me last year. Adorable, and kid/cat friendly enough for the bottom of the tree.

christmasdecor11

My favorite ornaments are my babies’ newborn handprints.

christmasdecor9

christmasdecor10

The project will make you scream with frustration, but if they turn out they’re worth it.

In ornaments-that-didn’t-make-it-on-the-tree news…

christmasdecor14

The cozy glow of the Christmas tree was my main motivation for getting the decorations up early this year, and I must say, it sure made driving home from work in a blizzard on November 24 that much more rewarding.

christmasdecor13

…even if our cozy glow is having some issues with a section of lights not working…

(Oh, and here’s how to make the burlap tree skirt – all you need is a glue gun, burlap and ribbon!)

Merry early Christmas! Or should I say, Happy Thanksgiving.

Lamb-themed baby shower (and my new etsy shop!)

Corban and Mara got their first cousin this April when my sister had a baby. In October they’ll welcome another! Peter’s eldest brother and his wife are expecting and we are thrilled to see our family grow.

I had the privilege of co-hosting a baby shower for my sister-in-law the other weekend in St. Louis. Planning from afar was low-stress since my co-hostesses took care of the food and venue. I was in charge of invitations, games and some of the decorations (a.k.a. my favorite parts!)

Since the mom-to-be, Jenny, is planning a lamb theme for their gender-neutral nursery, we ran with that as the theme for the shower. It was a lot of fun incorporating sheep into every aspect of the shower — I was especially excited to come up with some puns.

I’ll share details from the baby shower, but first I have some exciting news: I opened up an etsy shop! After planning several showers and themed parties over the past few years, I’ve designed a small collection of printable items — games, favor tags, invitations and the like. I definitely would have paid a few bucks to have modern designs for printable baby shower games at my fingertips when I was in planning mode, so there have got to be some people out there who would appreciate having these designs available, right?

I guess we’ll find out. I’ve listed a handful of instant download baby shower games (two of which you’ll see below) and plan to add a couple more listings, including one for the gold confetti themed invitations I designed for my sister’s baby shower and some lobster/sea creature art I designed for Corban’s room. I’m excited to see where (if anywhere) this goes — right now it’s just fun to see my work listed on the site!

On to the lamb-themed baby shower details. First, the invitations (from zazzle):

jennyshower1

front and back.

Now, the party itself!

jennyshower12

Table decorations were fun and simple to make. Jenny made an impressive diaper cake for my baby shower (here it is) so in a nod to her diaper artistry I made very unimpressive diaper circles wrapped in burlap.

jennyshower01

To keep with the lamb theme, and the sub-theme of books (the invitation suggests — not demands! — that guests write a note in a baby book instead of a card) I topped the diapers with a lamb book. There are quite a few cute options out there.

jennyshower02

Here is what the tables looked like in action:

jennyshower09

Love this book!

Also seen on the tables: games! And glittery pencils from Michael’s, and favors (which I’ll get to in a minute).

jennyshower03

These are my lovingly designed table games, some of which you can purchase for a few bucks in my new etsy shop!

Name the baby animals (buy here). Harder than you may think! My mother-in-law won this one.

jennyshower04

Name the children’s book (buy here). I thought this one was going to be too easy, but everyone was sufficiently challenged by it.

jennyshower06

Gift BINGO (guests fill out a BINGO card with items they think she will open). I downloaded it for free from here and customized it a tad using Photoshop.

jennyshower05

We also played “Don’t Say Baby,” where everyone starts with a bracelet, and if you get caught saying the word “baby” you have to give your bracelet to the person who catches you. At the end, the person with the most bracelets wins. It was a hoot seeing some of the ladies get into it.

My favorite games are the ones that involve the dad, so we played one called “Dad Knows Best.” I had my brother-in-law James answer some questions about the baby in advance and we all had to guess his answers. The questions I asked:

Will the baby be a boy or a girl?
Do you want the baby to be a boy or a girl?
Will the baby be born with a lot of hair?
If Jenny had no say, what would you name the baby?
If you had no say, what would Jenny name the baby?
Will you or Jenny be the disciplinarian?
Will you or Jenny be the first one to hear the baby cry at night?
Out of every 10 diapers, how many will you change?
What personality trait do you hope the baby will inherit from Jenny?What personality trait do you hope the baby will inherit from you?
Bonus: What sport will the baby play in high school?

Jenny did impressively well; the rest of us did not. Here is the little prize stash I picked out from the dollar bins at Michael’s.

jennyshower07

I also made a burlap bunting that Jenny can now hang in the nursery — “baaaby sherwood,” get it?

jennyshower11

The food was simple — chicken salad sandwiches, fruit salad, veggies and spinach dip.

Lamb detail on the bunting was my favorite. It’s just cut out of paper and hot-glued on, as are the letters.

jennyshower08

Lamb cupcakes were homemade by a friend of one of the co-hostesses, and they were divine.

jennyshower3

My mother-in-law found two lamb vases that she received — get this — when James (the dad-to-be) was born(!) and had them filled with beautiful flower arrangements.

jennyshower6

The guest book was fun to work on. I bought a burlap canvas, punched a bunch of circles from three different patterned sheets of scrapbook paper and hot-glued the dots (and some black legs and a head) into a lamb. Nursery art?

jennyshower4

Yes, but also a guest book! Everyone signed their name on a circle to be glued onto the canvas (either on the lamb itself or across the bottom).

jennyshower2

My co-hostess/partner in crime made these cute diaper decorations.

jennyshower10

And one last lamb pun: “Thank Ewe” tags (designed in Photoshop) for the favors, yogurt-covered pretzels tied with burlap strings in these bags.

jennyshower00

The mom-to-be (pictured with my co-hostess) had lots of laughs and (hopefully) felt very loved by the lovely group of ladies who attended.

jennyshower13

Meanwhile, these ruffians had fun at home with the men.

jennyshower5

It was a fun weekend overall, with the shower being the centerpiece. I’ve got a few more party recaps to share with you soon, so look forward to some more fun details!

Toddler Valentine’s Day

In all the hype surrounding the romantic side of Valentine’s Day… gifts, cards, dates, chocolate recipes (especially when you’re planning content for a lifestyle site – I have been living and breathing all of those topics), I had almost forgotten how much fun Valentine’s Day was as a kid.

Disney Princess valentines torn along the dotted lines. Candy hearts. Stickers. A pink hair bow. An exciting whirl of an afternoon slipping cards into your classmates’ decorated shoeboxes.

Peter and I did go out for a nice dinner this year on Valentine’s Day eve. It was romantic and very adult. I tried foie gras. But Friday morning I was reminded how fun and festive the holiday of pink and red is for those to whom a kiss is the thing that makes an owie better and a heart is one of the five shapes you can identify.

We went to a little party with some of Corban’s best buds and their moms. It started with lots of playing – with 11 kids ranging from age 5 months to 5 years it’s more like strangely choreographed chaos interrupted by occasional tears – and eventually moved to craft time for the older kids.

vday2014-7

vday2014-12

Yes, Corban is now one of the “older kids.” I don’t know when that happened and why it now seems like he’s always been one.

vday2014-9

They decorated picture frames for their dads with fun Valentine’s Day stickers.

vday2014-10

Then they made drawings to put in the frames.

vday2014-11

Somehow the pictures make this seem like a calm and controlled affair, but it was more like trying to keep a bunch of cats sitting at a table. I’m glad I was able to sneak away to snap some pictures, but crafts with a two-year-old are always very hands-on adventures!

vday2014-8

After Corban completed his frame, he decided to rip all the stickers off and throw them on the floor. I may have done a bit of reconstruction.

vday2014-15

Next on the agenda: cupcakes.

vday2014-5

Not hard to keep kids still for the approximately 2 minutes it takes to eat a cupcake!

vday2014-13

Then, the valentine exchange.

vday2014-14

There are so many cute ideas out there for DIY kid valentines. Oh, the puns! I promised myself I wouldn’t get too ambitious this year, but I wanted Corban to have some sort of hand in what he gave to his friends. Here’s what we ended up making:

vday2014-4

These were very easy to throw together the day before. I made a heart stamp from an empty toilet paper roll and had Corban (admittedly with the help of his nanny, not me) stamp hearts with white paint onto folded pieces of red construction paper.

vday2014-3

Then I filled resealable sandwich bags with about an inch of Valentine’s Day M&Ms…

vday2014-1

…and folded the tops down and stapled the construction paper sandwiched over the bag.

vday2014-2

So simple and fun to put together.

If you’re wondering what little Mara looked like on her first Valentine’s Day… well, I’d be happy to show you.

vday2014-17

vday2014-18

Sweet and smiling as usual.

Hope you had as lovely a Valentine’s Day as we did. I’m hoping to get back here with some more updates soon since it’s been a while!